PROJECTS: Bridgeport Series II
Bridgeport Series II
This Bridgeport series II Interact 2 machine had worked fine
since I acquired it in 2003. It had a Heidenhain TNC 151 control that is easy
to program in either of 2 languages. The controller has features to machine
contours and pockets and is easily programmed without CAD/CAM tools. Recently
when I went to finish a job that I had started I found the control would no
longer initialize. After checking the power supply, some of the voltages looked
wrong. I don't have schematics for the controller so this seemed like a good time
to upgrade the control to EMC2.

The old Heidenhain contoller:

Existing cabinet:


The large transformer in the lower left is for the servo
drives. Three servo drives are located in the lower right of the white panel.
Just above the servo drives are common mode inductors for the servo motor power
for each drive. The other transformer in the lower right is for aux outlet
power on the back of the machine and is not needed. In order to mount the PC
mother board in the cabinet I relocated the servo transformer.
The schematic picture shown above shows one of the servo drives.
Note that these servos use an analog +/- 10V velocity command for input and use a
tachometer on the motor for velocity feedback. This should make the control
relatively easy to setup as I only need to close the outer position loop with EMC.
The new PC motherboard was the ECS Goal-3 referenced on the Linuxcnc
web site. For I/O I selected the Mesa 5i20 with one 7I33TA and one 7I37TA. In the future
I hope to use a drive for the spindle and add a spindle encoder.
For the initial setup I just used halrun with a test hal file. This way
I could test to see that the motors moved according to the command signal and check
the position encoder feedback. This was the first setback in the project as I found that
the Heidenhain encoders produced analog sine and cosine 125 cycle/revolution output signals.
So to handle the encoder output problem I took the encoder interface board from the old
Heidenhain controller and mounted it on the back of the cabinet door close to the PC. The
Heidenhain board then outputs 625 A quad B digital cycles per revolution giving a resolution
of 2500 counts per revolution. The ball screws have a 5mm pitch and are driven by a 2:1
timing belt reduction from the motors. So 2500 counts of the encoder represents 2.5 mm of
motion or .001mm per count.
Control Cabinet with PC:


Heidenhain Encoder Board:

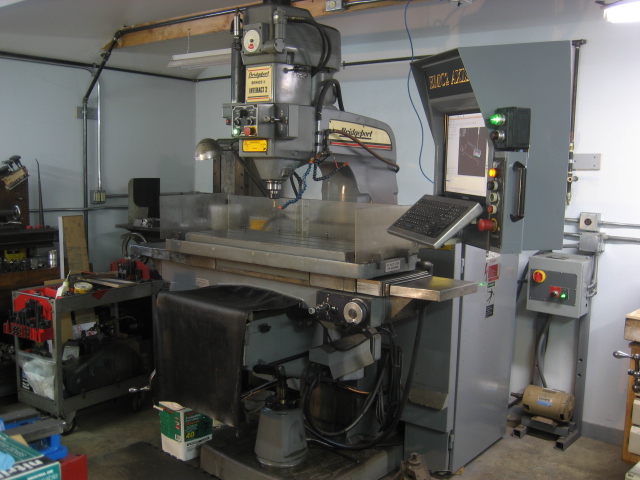
After I had the new control running I needed to have a display
and keyboard. I decided to use the existing pendant. I have a 17" LCD display
which just fits in the width of the pendant. So I needed to do some cutting and
welding to get the display to fit. With the 17" display there was no room left for
some of the buttons that I wanted from the old controls, so I added a 3" X 3" square tube
to mount the buttons.
Modified Pendant:

Extra Buttons:

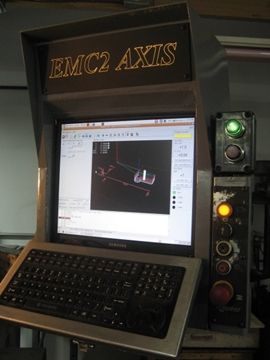
Finally I had an industrial water resistant keyboard that I wanted to
mount on the front of the pendant. I used the cnc machine to make some mounting
brackets that use 1/4" pins so the keyboard can easily be removed if necessary. I
needed to fill the hole in the top of the pendant with something so I painted a piece
of 1/4" acrylic black then cut the "EMC2 AXIS" with a .031" dia end mill and put a small
light behind it.
Finished Pendant:
Finished Machine:
For others that may be doing a similar retrofit you may view my hal
files. Some of the things I added to the hal files allow the use of external start
and stop buttons. The machine has an x-y joystick plus a z joystick each with a center
"rapid" button. Also I have an encoder input. The gains for the joystick and encoder
can be adjusted up or down using unused keyboard keys or buttons added to the
Axis interface panel.
bridgeportS2I2_postgui.hal file
panel.xml file
I_O_status.xml file
AXIS Screen:
